
When your Husqvarna mower lacks power, the problem is often a worn or broken drive belt. We’ll show you the clear Husqvarna drive belt diagram, the replacement step-by-step, and answer your most common questions.
Husqvarna Zero-Turn Drive Belt Diagram
The drive belt on a Husqvarna zero-turn mower is called by several names, but they all refer to the same part:
- Ground Drive Belt
- Motion Drive Belt
- Transmission Belt
- Hydro Drive Belt
This belt takes power from the engine pulley and transfers it to the hydrostatic transmissions (often called “hydros”). These transmissions let each rear wheel spin separately, which gives zero-turn mowers great agility. An idler pulley keeps the drive belt properly tensioned in this system.
For many popular models in the Husqvarna Z200 series, including the Husqvarna Z246, Husqvarna Z248f, and Husqvarna Z254, the drive belt structure is nearly identical. The image below shows the typical routing for a Husqvarna Z254 drive belt diagram. This diagram for one model is an excellent guide for the others.
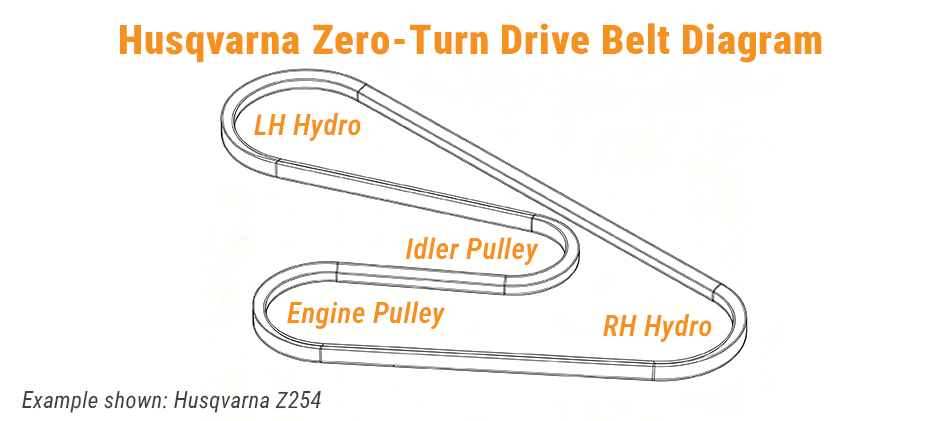
As you can see, the belt forms an “S” shape. It wraps around the main engine pulley, twists to engage the idler pulley, then runs out to the left-hand (LH) and right-hand (RH) hydro transmission pulleys at the back of the mower.
Husqvarna RZ5424 Drive Belt Diagram
Got an older model, like the popular Husqvarna RZ5424? Even though it’s part of the earlier RZ series, the ground drive belt works the same way. Power goes from the engine, through the belt and pulleys, to the hydrostatic transmissions that spin the rear wheels.
That said, there are small layout differences. The idler pulley’s exact spot, the position of belt keepers (guides that stop the belt from slipping off), and the overall belt length will likely differ from the Z200 series.
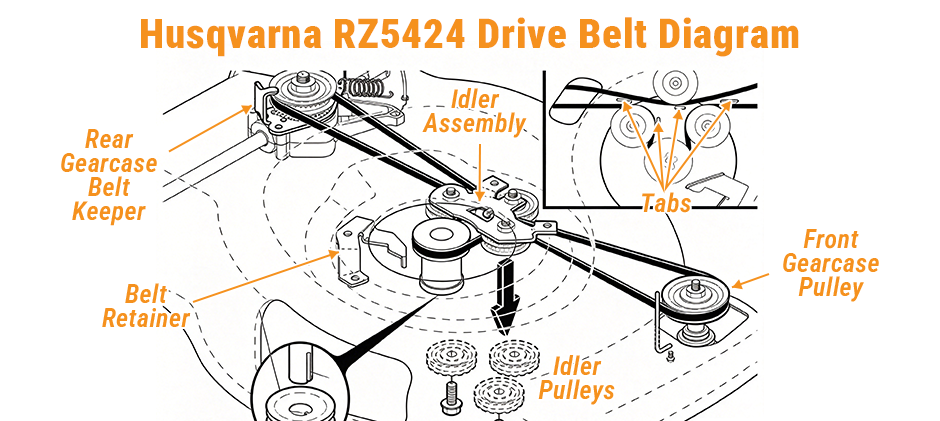
The Husqvarna RZ5424 drive belt diagram shows a similar path, but the arrangement of the pulleys and keepers may vary. Always use the correct diagram as your primary reference.
How to Replace a Husqvarna Zero-Turn Ground Drive Belt?
Replacing the Husqvarna zero-turn ground drive belt is not a difficult task. This guide is based on a common procedure for Z200 series mowers. Always disconnect the battery and remove the spark plug wires before starting any work. This prevents the engine from accidentally starting. Set the parking brake firmly.
Step 1: Prepare the Mower for Service
With the spark plugs disconnected, lower the mower deck to its lowest setting. This maximizes open access to the belts and pulleys for easier removal and installation.
Step 2: Remove the Deck Blade Belt
The deck belt (also called the blade belt) powers the mower’s cutting blades and runs separately from the ground drive belt. You will need to remove it first to clear your working space.
Remove the pulley cover from the mower deck. Push the deck idler pulley inward to loosen belt slack, then slide the belt off the blade pulley. Reach underneath the mower and slip the belt off the engine’s bottom electric clutch pulley to fully remove the deck belt.
Step 3: Remove the Mower Deck
Release all mounting pins and brackets that secure the deck to the mower frame. Slide the deck slightly forward to disengage it from the front hangers, then pull the entire deck out from under the mower.
Step 4: Take Off the Electric Clutch
The ground drive belt sits above the electric clutch, so clutch removal is required to access and replace the belt.
First, unplug the clutch’s wiring harness. Next, loosen and remove the large bolt that fastens the clutch to the engine crankshaft — this bolt is typically very tight. We recommend having a helper hold the top flywheel nut stationary with a wrench while you loosen the clutch bolt from underneath. Once the bolt is removed, slide the electric clutch carefully off the crankshaft.
Step 5: Remove the Old Ground Drive Belt
You now have full access to the ground drive belt. Ask your helper to press the spring-loaded idler pulley bracket to release belt tension. With the tension relieved, slide the belt off the engine pulley. After freeing the front section of the belt, unhook it from the two rear transmission pulleys and remove the old belt completely.
Step 6: Install the New Ground Drive Belt
Route your new belt according to the official Husqvarna belt diagram. Start by fitting the belt over the transmission cooling fans and seating it onto both rear transmission pulleys. Run the belt forward through the idler pulley assembly. Finally, have your helper compress the idler bracket again to release tension, then slide the belt securely onto the engine pulley. Double-check that the belt sits fully and evenly inside all pulley grooves with no misalignment.
Step 7: Reinstall All Components in Reverse Order
- Reinstall the electric clutch: Slide the clutch back onto the crankshaft, and ensure its anti-rotation bracket locks into the matching slot on the mower frame. Securely tighten the clutch mounting bolt while your helper holds the flywheel nut stationary. Reconnect the clutch wiring harness.
- Reinstall the mower deck: Slide the deck back under the mower frame, then reattach and fasten all mounting brackets and pins firmly in place.
- Reattach the deck belt: Route the deck belt back onto the electric clutch and deck pulleys, then reinstall the pulley cover.
- Final inspection: Reconnect the spark plug wires and battery. Your drive belt replacement is now complete.
Husqvarna Riding Mower Drive Belt Diagram
Traditional yard tractors such as the Husqvarna YTH series use drive belts for the same purpose, though the setup is a bit different. This belt is also called a ground drive or transmission belt. It links the engine pulley to the rear transaxle pulley — the transaxle combines the transmission and axle into a single assembly. A set of middle idler pulleys keeps the belt tight and guides its path.
Models including the Husqvarna YTH24V48 and Husqvarna yth22v46 drive belt diagram feature nearly identical drive systems. On YTH series diagrams, the belt runs from the small upper pulley on the engine output shaft, threads through the idler pulleys, and wraps around the large transaxle pulley at the rear.
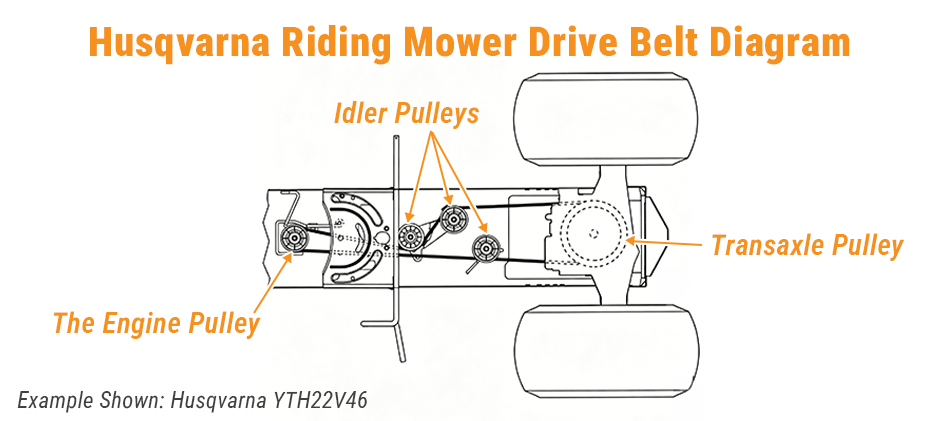
This diagram shows the key components: the idler pulleys, the transaxle pulley, and the engine pulley. The lever is part of the clutch/brake mechanism that tenses and releases the belt.
How to Replace the Drive Belt on a Husqvarna Yard Tractor
Replacing the belt on a yard tractor can seem intimidating, but it’s straightforward with the right approach. This process is typical for models like the YTH22V46.
Step 1: Safety and Preparation
First, remove the mower deck. If you’re unsure how, consult your owner’s manual. For easier access, safely raise the rear of the tractor using ramps or jack stands. Chock the front wheels to prevent rolling. Crucially, press the brake pedal all the way down and set the parking brake. This action is key as it moves the tensioner pulley and releases all tension from the drive belt, making it much easier to remove and install.
Step 2: Remove the Old Belt from the Front Pulley
Look at the bottom of the engine. You’ll see two pulleys; the larger, lower one is for the deck belt, and the smaller, upper one is for the drive belt. A wire belt keeper surrounds this pulley. Carefully pull down on one side of this keeper and work the belt out of the pulley groove. You don’t need to remove it from the shaft yet, just get it off the pulley.
Step 3: Remove the Belt from the Center Pulleys
Move to the middle of the tractor. You’ll see a group of three idler pulleys. Note how the belt is routed—taking a quick photo with your phone is a great idea. There are small stationary belt guides next to the pulleys. The belt runs between the guide and the pulley. Carefully slip the belt off these idler pulleys. This is also a great time to check the pulleys. They should spin freely with no wobble; if they feel loose or grind, now is the time to replace them.
Step 4: Remove the Belt from the Rear Transaxle
At the very back, the belt goes around the transaxle pulley. This pulley is located just below a plastic cooling fan. You must be careful not to damage the fan blades. Work the belt up and over the fan blades, one section at a time, until it’s completely free from the transaxle. You can now pull the entire old belt out. Before proceeding, hold the old belt up next to the new one to confirm they are the same length.
Step 5: Install the New Belt
Installation is the reverse of removal.
- Rear First: Start by carefully working the new belt over the cooling fan and onto the transaxle pulley. Ensure it’s seated in the groove and not caught on a fan blade.
- Thread Forward: Route the belt forward, to the left of the steering gear assembly.
- Center Pulleys: Weave the belt through the idler pulleys, using your photo as a guide. Remember the rule: if the pulley is grooved, the “V” side of the belt rides in it. If the pulley is flat, the flat back of the belt rides on it.
- Front Pulley: Finally, work the belt back inside the wire keeper and onto the upper engine pulley.
- Final Check: With the belt fully routed, slowly release the parking brake. You should see the idler pulley move to apply tension to the belt. Double-check the entire path to ensure the belt is secure and correctly routed.
Drive Belt vs. Deck Belt
It’s a common point of confusion, but your mower has two major belts that do very different jobs.
- Drive Belt (Ground Drive Belt): This is the belt we’ve been focusing on. Its only job is to make the mower move. It connects the engine to the transmission (on a zero-turn) or the transaxle (on a yard tractor) to power the wheels.
- Deck Belt (Blade Belt or Mower Belt): This belt’s job is to spin the cutting blades. It runs from the engine’s electric clutch down to a series of pulleys on the mower deck itself.
If your mower moves fine but won’t cut grass, the problem is likely your deck belt. If the blades spin but the mower won’t drive, the problem is your drive belt.
Final Thoughts
Knowing your Husqvarna drive belt diagram is the key to a successful repair. Whether you own a zero-turn or lawn tractor, the principle is the same: the belt transfers engine power to the wheels through a system of pulleys. FridayParts stocks a huge selection of aftermarket Husqvarna parts to help you finish your repair smoothly.