
After a long break from winter, is your lawn mower ready for the heavy spring workload? To adapt to the mowing, you have to prepare the mower with functional mower parts, and the battery is a crucial component. A reliable lawn mower starts with a healthy battery. When your mower refuses to start, a dead or low battery is often the culprit. Knowing how to charge a lawn mower battery correctly is essential for keeping your equipment ready and extending battery life. In this guide, I will provide clear steps and tips for charging your mower battery safely and effectively.

Safety First: Essential Precautions
Working with batteries involves potential risks like electric shock or exposure to acid. Always prioritize safety:
- Wear Safety Gear: Put on safety glasses and gloves before handling the battery or charger.
- Work in a Ventilated Area: Charging produces hydrogen gas, which is flammable. Ensure good airflow, away from open flames or sparks.
- Turn Off the Mower: Make sure the lawn mower ignition is off, and the key is removed.
- Inspect the Battery: Check for cracks, leaks, or damage. Do not attempt to charge a damaged battery.
- Read the Manuals: Consult both your lawn mower’s manual and your battery charger manual for specific instructions.

Understanding Your Battery and Charger
Most lawn mowers, especially riding mowers, use a 12-volt lead-acid battery, similar to a car battery but smaller. You’ll need a battery charger specifically designed for or compatible with these types of batteries.
Charger Types:
- Manual Chargers: Require you to monitor the charging process and unplug them once the battery is full to prevent overcharging.
- Automatic Chargers: Detect when the battery is fully charged and switch to a maintenance or float mode, preventing overcharging. These are generally safer and more convenient.
- Trickle Chargers: Provide a low, slow charge, ideal for maintaining a battery’s charge during storage (trickle charging lawn mower battery) or for gently reviving a deeply discharged battery.
Using the wrong charger or settings can damage your battery. Always match the charger’s voltage to the battery’s voltage (usually 12V).
Step-by-Step: How to Charge Your Lawn Mower Battery
Follow these steps for a standard 12-volt lawn mower battery charging process:
- Locate and Access the Battery: On riding mowers, it’s often under the seat or hood. On push mowers (with electric start), it might be near the engine. You may need simple tools to remove covers.
- Clean the Terminals: Dirty or corroded terminals hinder charging. Disconnect the cables (negative first, then positive). Clean the battery posts and cable connectors with a wire brush or terminal cleaning tool. A mixture of baking soda and water can help neutralize corrosion. Wipe clean and dry thoroughly.
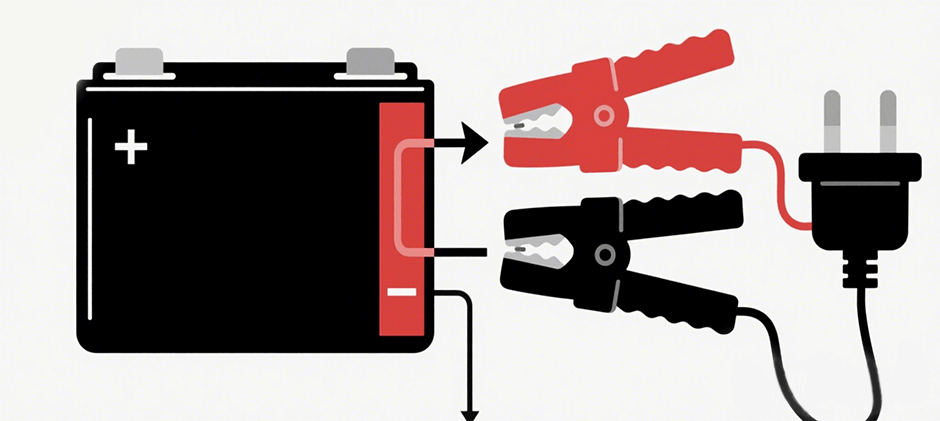
- Connect the Charger:
- Connect the positive (red) clamp from the charger to the positive terminal (+) on the battery.
- Connect the negative (black) clamp from the charger to the negative terminal (-) on the battery.
- Safety Note: Ensure clamps have a secure metal-to-metal connection and are not touching each other.
- Set the Charger: If your charger has settings, select the correct voltage (12V). Choose the appropriate current settings (amperage). A lower setting (e.g., 2 amps) provides a slow charge lawn mower battery experience, which is generally better for battery health. Higher settings (e.g., 6-10 amps) charge faster but can generate more heat. Avoid using very high “engine start” settings for regular charging.
- Plug In and Monitor: Plug the charger into a working power outlet. Turn the charger on if it has a power switch. Monitor the charging process. Automatic chargers will indicate when charging is complete. Manual chargers require you to check progress, possibly with a voltage meter or by observing the charger’s indicators (like an ammeter needle falling).
- Determine Full Charge: A fully charged 12-volt lead-acid battery typically reads around 12.6-12.8 volts with a voltmeter when resting (not actively charging). Refer to your charger’s indicators (e.g., a green light).
- Unplug and Disconnect: Once charged, turn off and unplug the charger from the power outlet first. Then, disconnect the clamps from the battery, removing the negative (black) clamp first, followed by the positive (red) clamp.
- Reinstall: Reconnect the battery cables to the mower (positive first, then negative) and secure any covers you removed.
How Long to Charge a Lawn Mower Battery?
The charging time for a lawn mower battery varies significantly based on:
- Battery size and capacity (Amp-hour rating).
- How depleted the battery is (low vs. dead).
- The charger’s output amperage.
A slow charge (e.g., 2 amps) might take 12-24 hours for a significantly discharged battery. A faster charge (e.g., 6-10 amps) might take 4-8 hours.
Estimated Charging Times:
| Charger Output (Amps) | Battery State | Estimated Time | Notes |
|---|---|---|---|
| 2 Amps (Trickle) | Partially Discharged | 12-24 hours | Best for maintenance & longevity |
| 2 Amps (Trickle) | Very Low / Dead | 24-48+ hours | May not recover deeply discharged battery |
| 6 Amps | Partially Discharged | 4-8 hours | Moderate speed |
| 10 Amps | Partially Discharged | 2-5 hours | Faster charge, generates more heat |
Note: Always refer to your charger’s manual. Overcharging, especially with manual chargers, can severely damage the battery. Automatic chargers prevent this.
How to Charge a Dead Lawn Mower Battery
If your battery is completely dead, it might be harder to recharge.
- Use a low amperage setting (e.g., 2 amps) for a slow charge. This is gentler on a deeply discharged battery.
- Some modern “smart” chargers might not recognize a battery if its voltage is extremely low. A very old-school manual charger might be needed initially, or sometimes connecting it in parallel with a healthy battery briefly can raise the voltage enough for the smart charger to detect it (attempt this only if you are experienced and understand the risks).
- A battery that won’t hold a charge after attempting a recharge likely needs replacement.
Alternative Methods (Use with Caution)
- Charge a Lawn Mower Battery with a Car: This usually refers to jump-starting, not fully charging. You can jump-start start lawn mower battery using a car and jumper cables just like a car battery. Connect positive-to-positive and negative-to-ground points on the mower frame (away from the battery). Start the car, wait a few minutes, then try starting the mower. This does not fully charge the mower battery; you still need a proper charger. Running the mower engine for an extended period will provide some charge, but a dedicated charger is more efficient.
- Charge a Lawn Mower Battery Without a Charger: It’s strongly advised against trying makeshift charging methods. However, if you have another 12-volt charger (like one for a car or motorcycle) with appropriate low-amperage settings (e.g., 2-6 amps), it can often be used. Never use a charger with the wrong voltage or an unregulated power source.
Battery Maintenance Tips for Longer Life
Proper charging is part of good battery maintenance. Also consider:
- Keep terminals clean and tight.
- Check electrolyte levels (distilled water only) if your battery has removable caps (less common now).
- Store batteries in a cool, dry place during the off-season.
- Use a trickle charging lawn mower battery method or charge periodically (e.g., monthly) during long storage periods to prevent deep discharge.
- Perform a regular battery voltage check to monitor its health.
Conclusion
Properly charging your lawn mower battery ensures reliable starting and maximizes its lifespan. Following safe procedures and using the correct battery charger are key. Regular maintenance prevents unexpected failures when you need your mower most. If your battery consistently fails to hold a charge, it’s likely time for a replacement.
At Fridayparts, we understand the importance of reliable equipment. If you find your battery or charger needs replacing, explore our vast inventory of high-quality aftermarket lawn mower parts for many lawn care brands. We offer affordable prices and wide compatibility, ensuring you get the right part to keep your mower running smoothly. Visit Fridayparts today for your battery and other essential mower part needs!